![[Translate to English:]](/fileadmin/Der_SAC/Unserer_Partner/CSS_cyan_rgb.svg)
© Eveline JeanRichard
Safety when snowshoeing Ten tips
Snowshoeing offers great opportunities to discover nature, share experiences, take on responsibilities and keep fit. The following advice will help you deal with any danger you may have to face in the winter.
These ten points are based on the recommendations made by the CAA and have been completed by the SAC training and safety experts. However, they can’t replace training courses, which provide a solid base and help you expand your competences and improve your technique with qualified instructors.
Ten tips
1. Fit and healthy
Snowshoeing is an endurance sport. The effort it demands, which is beneficial for the heart and circulation, requires you to be in good health and able to assess your abilities. Avoid being pushed by time and adopt a pace which is suited to all members of the group. Bear in mind that you will need to save energy for the descent.
2. Careful planning
Information about distance, height differences, the level of difficulty and the conditions can be found on maps, in guide books, online or by asking experts. The weather forecast is particularly important as storms, snow, wind and cold weather can greatly increase the risk of accidents. Make sure you always plan alternative routes. Take note of the emergency mountain rescue phone numbers of the country. (REGA 1414; European emergency number: 112).
3. Appropriate equipment
Make sure your equipment is suitable for winter conditions and for your destination. If you’re headed for areas prone to avalanches, avalanche transceivers, spade and snow probe, first aid kit, bivouac sack and mobile phone constitute the standard emergency equipment which everyone should carry. Check your equipment before every outing and emphasise the importance of this to all the other members of the group. For outings on glaciers, the safety measures and equipment are the same as for ski touring.
4. Grading system
As for hiking, the SAC has established a grading system which provides information about the level of difficulty and skills required on a scale of 6 (WT1 to WT6). This scale mainly indicates the gradient, the risk of falls and the possibility of evaluating the danger of avalanches. However, it does not take into consideration the difference in height nor the time required. Therefore, a five-hour hike can easily be classified as WT1 (easy) and a two-hour one at a higher altitude as WT6 (difficult).
5. Avalanche report and snow conditions
Before setting out, get detailed information concerning the risk of avalanches. Check the avalanche report, paying particular attention to the danger level (1-5), and information about the type of danger (what is the main danger today?), exposure and altitude. Take note of the dangerous sections (what dangerous parts will I be confronted with?) and the evolution of the weather conditions during the day.
6. Evaluate the danger of avalanches
It is very difficult to determine the risk of avalanches. Base your decision on strategic methods to estimate the risk and learn to recognise the warning signs (e.g. snowdrifts). Steer well clear of dangerous areas and turn back if in doubt. Bear in mind that avalanches can also occur in the forest.
7. Breaks and orientation
To keep up your energy levels and stay concentrated, it is important to take breaks, to eat and to drink. Hot, isotonic drinks are ideal for quenching your thirst and warming you up, especially in the winter. Always use your sense of direction to find where you are and check it by using a map, a compass, an altimeter or a GPS. It is essential to have this equipment on you for orientation. Other skiers’ tracks provide no guarantee so be wary of them!
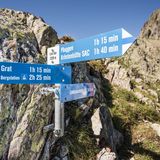
8. Marked paths vs open ground
Many winter sports resorts have a network of marked paths for snowshoeing which have several advantages. To begin with, the signposts help you know where you are. These routes usually don’t include sections exposed to avalanches. However, should there be a risk, the staff in charge will close them. Information concerning the length, height difference and level of difficulty is also given so that you have a good idea of the skills required.
9. Small groups
There are fewer risks with small groups (up to 6 people). Dangerous situations can be avoided by communicating clearly with the other participants and respecting one another. Stay in a group and share your impressions. Every member of the group must know where you’re headed to and what route they are taking. Make sure a family member knows your destination, what itinerary you have planned and when you expect to be back. If you’ve planned an outing on your own, beware: minor incidents can easily turn into serious emergencies.
10. Respect nature and the environment
High mountain areas are a precious area for discovering the uniqueness of nature. Appreciate this freedom and respect the fragile environment and the areas where animals take refuge. Stay on the official paths and avoid reforestation areas. Use public transport or car sharing.